
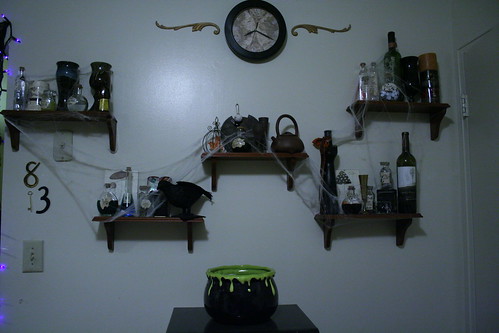
The cauldron below the shelves is perched on top of my microwave. When we have our Halloween party, the microwave and cart will be draped in black fabric and the cauldron will be filled with punch. Enough of that though, let's get to talking about the shelves! Clicking on any of the photos will take you to it's Flickr page where you can view it larger and see more detail.

On display on this shelf I have arranged a raven, a tea tin with it's label turned towards the wall and 3 bottles I filled with 'spooky' things, like an elixir of zombification, clairvoyance potion and graveyard dirt. I used the tea tin as a riser for a small tin shrine I received in a swap. The vintage mushroom diagram is always on that shelf and fit right in with the decorations. 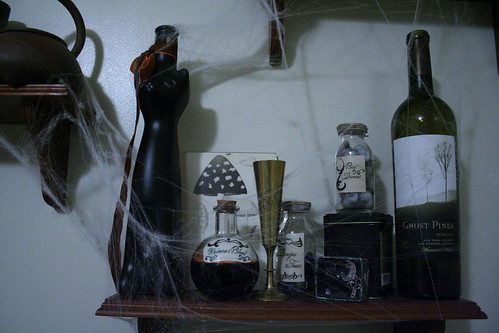
This shelf is flanked by two wine bottles that I absolutely love, a solid black glass cat and Ghost pines. In between the bottles is another vintage mushroom diagram, another tea tin facing the wall, a small shrine devoted to bats that I received in a swap, a vintage brass flute, and more potions and ingredients; bad dreams, dragon's tears and unicorn's blood. 
The central shelf (and last shelf I will be sharing in detail) showcases my favorite teapot, a clay japanese teapot given to me by my lovely, a voodoo doll style kitchen witch from Spain, a caged bird ornament that I bought last Christmas, 2 small vintage german cups, an aged metal adornment that I bought at a garage sale over the summer and a potion of factual aquisition. 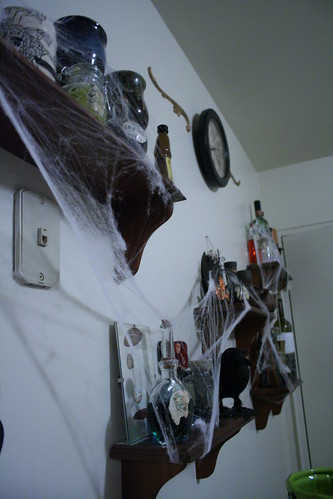
I completed the shelves by arranging some more potions on the top shelves with the things that were already there and covering everything in thin fake cobwebs.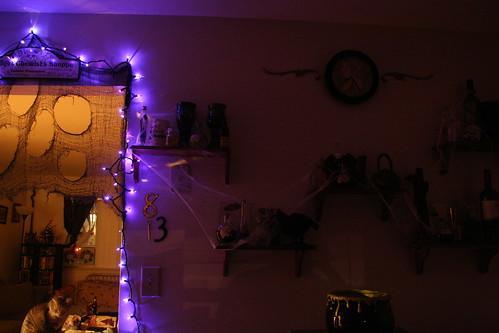
I finished off the kitchen with a chemist's sign, some holey fabric and purple Halloween lights.
Here is a closer look at some of the bottles, which I made last year:
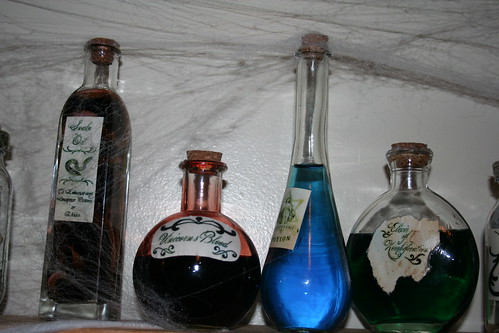
If you're still reading and interested in making your own Apothecary bottles, this is how I made them:
1) I went to my local craft store and bought a bunch of their $1 bottles in various shapes and sizes. I also bought a bag of corks that would fit the bottle. If there is anything you want to put in the bottles that you don't have at home, feel free to pick that up too! I had all of my supplies at home already, so this project cost me $12 for 10 bottles. Not too bad.
2) Once home, take the price stickers off of your bottles and assemble your supplies. You will need:
- Bottles
- Corks
- White Vinegar
- Food Colouring
- Any solid objects to put in your potions, such as google eyes, colored class pebbles, dirt, etc.
- twine
- hot glue gun and glue
- mod podge or other decoupage medium
- printer and paper
- tea
- Paint/Sponge brush
3) Decide what you want your bottles to hold and fill accordingly. For potions, fill your bottles with vinegar and add food colouring until you achieve the look you want. Once your bottles are filled to your satisfaction, line the thinner part of your corks with hot glue and jam them into the necks of the bottles. Glue should ooze over the top, which is what you want. Make sure your bottle is sealed securely by hot gluing around the cork/bottle opening. If you want the dripping waxy look, go nuts here... let the glue ooze down the side of the bottle, cover the entire cork in glue; whatever you want to do. If you want your bottle to look more rustic, run glue around the top of the bottle neck and cork and wrap twine tightly around it.
4) Now that your bottles are filled and sealed, they're going to need labels. You can hunt for free graphics online or make your own using Photoshop, the Gimp, etc and a font that you enjoy. Once your labels are designed and sized to fit your bottles print them out and let the ink dry completely before moving onto the next step.
5) Is your ink completely dry? Make sure by leaving them alone a bit longer and brewing a very strong dark batch of black tea. You won't need much, 1/3 cup should do it. Once your tea is brewed and ready to go, bring your label papers out and place them on newpaper. Take your paint brush and your tea and drip/sponge the tea onto the papers. DO NOT paint the tea on or you risk destroying your label. Once your paper is covered in enough tea to look aged, let it dry for a bit. You can recoat with tea if you aren't happy with the richness of the stain, just make sure the paper dries between coats.
6) If you want aged edges on your labels, rather than straight scissor cuts, go back to your labels while they are still damp and tear around the label, don't try to tear in a straight line, just let it go. Now, let the labels dry completely.
7) Once the labels are dry, it's time to stick them to your bottles! Get your decoupage medium and brush a thin coat onto the back of your label and onto the bottle. Stick the label onto your bottle and let dry. Once dry, brush decoupage medium over the label, making sure to get some on the bottle around the edges of the label to seal it on. Let it dry and enjoy your creation!
Some Apothecary Bottle "Recipes":
Stingers of Jellyfishes:
- Grab a sheet of waxed paper and your hot glue gun. Run glue lines of varying thickness randomly on the waxed paper. Don't worry about the tendrils that always end up happening when you move the gun, in this case, those are great!
- Peel the hot glue strands lines off the paper once they've cooled and pop them into a jar or bottle. Now fill your bottle with enough vinegar to cover them and dye it a light shade of yellow.
Bad Dreams:
- Take a few cotton balls (or fake cobwebs, since it IS the season for them!) and pull them apart, making them light and wispy.
- With charcoal or dark chalk rub bits of the cotton to dirty it up. Pop it into a bottle or jar, cork it and label it.
Snake Oil:
- Cram a few small rubber snakes into a bottle/jar. Fill the jar with vinegar and dye it whatever colour you think snake oil should be! I tinted mine with enough coloring to make it a dark oily brown. The snakes show through when the light hits it just right for an eerie effect!
These are just a few of mine, feel free to use them or come up with your own!
These are AWESOME displays! I think you should keep it up year-round! Thank you for all the great and creative ideas!
ReplyDeleteYou are AMAZING! Thanks so much for this wonderful tutorial :)
ReplyDeletewow this looks so gooood!!
ReplyDeleteWish we had Halloween in The Netherlands.
this is great! thanks for the tips and pics!
ReplyDeleteWOW!!! Thank you so much for the tutorial on making potions!!!! That was great!
ReplyDeleteI love your wall with the shrines and Halloween decorations!!! So cool~
Thank you for your comment on my witches ... It's going to be a hard choice!
Pattee
Seriously, D...you're brilliant.
ReplyDeleteThese look SO GOOD.
I'm totally digging your apothecary wall. :)
)O(
boo
this is amazing! where did you get the bottles? I am currently looking for apothecary bottles online but cant seem to find what im looking for (like the bottle of Elixir of Zombification). Really looking for that shape...
ReplyDeleteHey there! I picked up the bottles at my local craft store (I believe it was an AC Moore) for about $1-$2 a piece. Hope that helps!
Delete